It's been road trip season for me. I just completed a miniature sweep of the east coast, surveying mountains, oceans, and state-run liquor stores. Now I'm about to embark on a journey from the Windy City to the Twin Cities. I've a special fondness for long distance driving--even in inclement weather when I'm plowing through dual snowstorms acutely aware of the fact that I'm a jerk of the wheel away from veering into an embankment. Highways hold some splendid adventures and I'm always excited to explore more of this overgrown sprawl of a nation. So to Minnesota it is for the first time in my life, and about time, too.
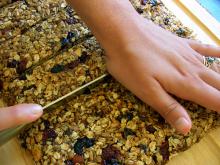
Of course, it wouldn't be a road trip proper if I didn't first equip myself with road snacks. Gas station snackage works in a pinch but tends to get pricey and/or repulsive, so I like to plan ahead with an evening of hurried baking prior to my departure. I just put an old staple of mine out to cool; by the time I get up, it'll be ready to cut and Ziploc away. I call it just 'granola' because despite my best efforts to mold it into bars, it likes to break up and flake off into awkward, shapeless chunks that hardly resemble rectangles even at their shapeliest. They've got the taste and texture of homemade granola bars down, but something about the bar format just doesn't sit right with these guys--at least not under my knife. I usually just end up breaking them apart by hand old-school style. Oh well. They're tasty, healthy, and easily scrounged for from behind the wheel, even if they do get your fingers unreasonably sticky.
My granola masses are sort of a Frankensteined take on the Barefoot Contessa's. She uses crazy stuff like shredded coconut in hers, and not being a huge coconut guy myself (and never needing it for any other recipe, ever) I tend to skip out on that bit. I like to throw in a little chocolate in its stead, being an eternal 6th grader whose image of the perfect granola bar stems from the gooey, prepackaged junk that served as elementary school snack time way back in the day. Old habits die hard, but I find the way the chips melt and swirl into the glue of the bars to taste even better than anything Quaker Oats could cobble together.
Here's what you're going to need:
- 2 cups oatmeal (old-fashioned, not quick-cooking, although I suppose not all would be lost if you only had the finer stuff)
- 1 cup sliced almonds (optional--I include them about half the time)
- 1/2 cup toasted wheat germ
- 2/3 cup honey
- 1 1/2 teaspoons vanilla extract
- 1/4 salt
- Whole buncha dried fruit (about 1 1/2 cups--I like cranberries, golden raisins, and chopped dates, but do what makes you feel good)
- Smattering of dark chocolate chips (I prefer to use the tiny kind--melts easier, looks neat)
Heat up the oven to 350. On a big old cookie sheet (mine is not big enough for this task and so it takes longer than it should) toast the oats and almonds if you're using them. Stir them up every so often. This should take about 12 minutes, although I always let them get a little toastier than that. You should know by the smell when they're ready. Pour them into a big bowl, stir in the wheat germ, and reduce the oven heat to 300. Drip the honey over the dry mixture while it's still hot and stir until it's all glued together. Add in the fruit and the chocolate. Pour everything into a buttered, parchment papered baking disk (8x12 or so). Wet your fingers and slam that goo down until it's perfectly dense. Bake for 20-30 minutes (you can do 15 if you like em real chewy--30 will give you crunchy bars). Take out the pan and let it cool/coagulate for at least 2 hours before cutting (or sloppily breaking) the granola into pieces. Enjoy on all your travels.