Colcannon

Well did you ever make colcannon,
made with lovely pickled cream
With the greens & scallions mingled
like a pitcher in a dream
Did you ever make a hole on top
to hold the meltin' flake
Of the creamy flavoured butter
that our mother's used to make

Even if you aren't Irish,

you might know the song "Colcannon," popularized in the U.S by Mary Black. In the song, the joys of Colcannon, a dish made of mashed potatoes, cabbage (or kale), scallions, and butter (lots of butter!) are celebrated. Colcannon was a staple for rural Irish families, since it used ingredients that were local and readily available, and quite affordable. If you were lucky, you might have a bit of good Irish bacon to saute with the scallions and serve to season the dish.

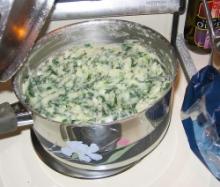
The name colcannon derives from the Irish cál ceannann, cál, cognate with English kale, both borrowed from Latin caulis or "cabbage," with the compound ceann, head , from Old Irish cenn, plus the lenited (the f is dropped) or "white," for a phrase that means "white-headed cabbage."

In the most basic, traditional form, Colcannon is made from mashed potatoes, kale (or cabbage, but since I much prefer it with kale, I'll be talking about kale here), butter, salt, and pepper. Depending on the cook, and how you make mashed potatoes, colcannon can be made with other ingredients like milk (cream), leeks, onions, chives, garlic, boiled ham or Irish bacon. Although it's most frequently made in the fall, when kale is plentiful, there's no reason it has to be an autumn dish. I note that the more traditional recipes call for huge quantities of butter; feel free to adjust to suit your taste. Garlic is a nice addition, but it is not one that's traditional.

My preferred method involves boiling the potatoes (steaming works well too), with the skin on or off to suit local preferences. I then mash the potatoes with milk or a bit of heavy cream, butter, and salt and pepper while I cook the kale either by steaming it or blanching it for a minute in rapidly boiling salted water. I saute the bacon and scallions (or leeks or onions) in a bit of butter, then chop the kale (go ahed and use a food processor if you have one), and stir the kale and the seasoned scallions into the mashed potatoes.

Serve the colcannon with a small well or depression in the top to hold a pat of melting butter, or melt butter to drizzle into the depression before serving. It's lovely accompanied by Guinness.

For alternative recipes, see here, here and here, or watch the video here.

The Truth about Corned Beef

Every year around St. Patrick's

day in the U.S. the grocery stores start putting corned beef brisket on sale and on display, and restaurants and pubs add corned beef and cabbage to their menus as the Irish entree. Unfortunately, corned beef and cabbage, even when accompanied by potatoes, is more American (or Germanic) than Irish; we'd do better to celebrate Irish cuisine with salmon or colcannon, a dish of potatoes and cabbage (that's even better made with kale).

As much as I like corned beef, I'm here to tell you that it's not really very Irish, though it is very American. Historically, the Irish raised pigs for meat, and beef for milk. If you butchered a cow, you did it in later October or early November, at Samain, and by March that meat, even if you cured it by corning it, was gone. Pork was a staple of the Irish diet, particularly bacon. When Irish immigrants arrived in Boston and New York, their beloved Irish bacon was not available; what was available was corned beef, thanks to Jewish delis and butchers in New York, and the New England Boiled Dinner popularized by German immigrants to Massachusetts and other New England states. The corn in the phrase corned beef refers to salt-curing, or brining. The corn refers to the large grains of salt used in curing the beef. The meat was placed in a crock and liberally covered with large grains (or corns) of salt. Etymologically, corn comes from the Germanic root kurnam, used to refer to small seeds or kernals, cognate with kernal and with Latin grain. Corned beef, traditionally made with a brisket of beef in Eastern European and Jewish traditions, is fairly simple to do at home.

The Irish immigrants, unable to locate or in some cases afford the distinctively different Irish bacon,

traditionally served with cabbage and potatoes, possibly with carrots or other vegetables turned to corned beef. Traditionally, beef in Ireland was a luxury; in the middle ages, cows were prized for their milk. Dairy products were so important in medieval Irish diets that cheeses and similar milk products were called "white meats." In the eleventh century medieval Irish satire Aislinge Meic Con Glinne/The Vision of MacConglinne, MacConglinne attempts to entice a "demon of gluttony" to exit an abbot by preparing a magnificent feast that includes "And he called for juicy old bacon, and tender corned-beef, and full-fleshed wether, and honey in the comb, and English salt on a beautiful polished dish of white silver, along with four perfectly straight white hazel spits to support the joints." This is very clearly an over-the-top outrageous feast, and the use of corned beef in the feast points up that it was considered extravagant.

Pork was by far the more common meat, even after the English conquest, since what beef there was was exported to England (especially during the Napoleanic wars), leaving potatoes, fish, pork and cabbage for the native Irish. You'll find Irish families and restaurants even now having gammon, or a roast joint of pork, as a family dinner. The Irish kept emigrating to America, bringing Irish cuisine and traditions with them but of necessity modifying them to suit the new land.

The very first St. Patricks Day parade was held in Boston in 1737; what was until very recently a solemn day of church attendance in Ireland, followed by a Sunday dinner with the family, very quickly became an opportunity to celebrate ethnic pride as St. Patrick's Day parades took place a few years later in New York, and quickly became an annual tradition all over America. At the same time, in part because of tourism from descendants of Irish emigrants returning to Ireland, St. Patrick's day is becoming more of a secular tradition in Ireland. Though I suspect the inclusion of corned beef on St. Patrick's Day menus there is a nod towards their American guests; Irish cuisine today, freed from the burden of export, features local and fresh ingredients, and while pork and potato are still important ingredients, so are the amazing local mackerel, prawns, lobster and salmon, and beef as well as Irish cheeses, and incredible locally grown produce, and of course, the lamb that's so much a part of Irish Stew.

Cooking Sour-Cream Salmon

For my cooking adventure yesterday, I chose to prepare some pasta with salmon because I was tempted by the mouth-watering picture in the cookbook. Unfortunately, my memory of which items I actually had in stock in my kitchen was a little lacking, so I didn’t quite get the chance to make exactly what I had anticipated. (underlying meaning: it’s tough to make pasta with salmon when you don’t have any pasta in your cupboards).


I was left with a dilemma. How could I, one of the worst cooks in the entire world, ever prepare salmon delicious enough for me to eat? It was a challenge.

I thought back to other people who had cooked salmon for me and remembered  a house guest's simple recipe. I got out my ingredients, which I should keep a secret, but will disclose here: sour cream (none of that shitty ‘lite’ stuff either) and lemon garlic pepper. (I probably could have used actual lemons, actual pepper, and actual garlic, but since I was only cooking for myself, but didn't want to take a trip to the grocery store for the lemons.)

After taking out the salmon fillet (it was billed as wild, which is important for both getting more Omega Fatty 3’s and for helping to protect the environment by stopping fish farming,) I carelessly slabbed a heap of sour cream on the salmon, then spread it out as evenly as I could, and finally sprinkled the fillet with the lemon garlic pepper, which again, was definitely the lazy way to cook.

I needed a veggie, so looked through the freezer in honor of frozen foods month and took out some organic asparagus and read the directions on the package. I was surprised to see that the directions said to either cook the asparagus in the microwave or boil it on the stove in the packet. I’m a pretty adventurous person in general, so I bravely chose to ignore the directions on the packet, and put a few of the organic, already-cut asparagus in the same pan with the fish.


I put the fish in the oven at about 375 degrees and checked it every so often to see if it was cooked. After approximately 11 minutes and 35 seconds, the salmon fillet was done to my satisfaction.


Voila, sour cream and lemon-ish salmon for a party of one as I am not really confident yet enough in my cooking ability to cook for anyone that I am not directly related to and even then it is a stretch.


The Mysteries of Bread Dough

I had my first semi-success with the sourdough starter this week.  After several failures!  It isn't easy to convert from an inveterate bread machine bread maker, to a by hand sourdough bread maker, believe me.

The most frustrating part has been that a lot of the success of your bread depends on learning whether or not it "looks about right."  There are a few guidelines to what looks right and what doesn't, but unfortunately you really do have to develop a sense of your own, about whether a loaf is too dry or too wet, whether it needs more kneading, or any kneading, or just a bit of folding, and whether it's done rising or not risen enough, or (horrors never end!) over-risen.

There are three basic stages to bread dough:

1.  The initial mixing of ingredients.  

I don't have a stand mixer, so I'm mixing everything in by hand.  I basically try to mix it all enough that it is homogenous, and I don't aim for actual kneading.

The most common error at this point is making your dough too dry.  As it rises and the yeasts do their work, a lot of the moisture will be consumed in the process.  This means that however it looks now, it will be a lot drier by the time it's done.

I aimed for a dough that is just firm enough to pick up a handful.  As opposed to my first two attempts, which were way too wet and sloppy - like cake batter.  Don't worry if your dough is too wet, you can add more flour later.  But dough that is too dry can fail to form properly.

2. Periodic kneading

I have been splitting the difference and taking the middle road here.  Two or three times during the rise, I will fold the dough. I do this using a spatula, following the (ever so hypnotic) procedure I learned about here.  I prefer to knead less, and let the dough rise for longer.  

My understanding is that each method lies somewhere on that continuum.  A bread maker kneads your dough a lot, and your bread is done in three hours (plus baking time).  At the other end you have the various "no knead" recipes, in which you never knead, but it takes the dough 24 hours to rise.

There is a lot of talk about how kneading helps to "develop the gluten strands."  I frankly don't know if there's any science behind that or not.  I do know that a bit of folding helps to redistribute the yeast and flour, and keeps the rising process moving a bit.

3.  Is it ready to bake?

In the last few hours of rising, the bread will have a big change in texture.  It goes to what some call 'baby bottom smooth" and others call "cellulite."  It becomes lumpy underneath, with a smooth, relatively dry cover.

Your bread is ready to bake when, if you poke it, the dent doesn't fill in.  I found with my loaf that if I could perform this test without the dough sticking to my finger, it was ready!


Creative Commons-licensed image courtesy of Flickr user Dalboz17

Cornmeal Pancakes

Right off the bat, I need to make it clear that I am not talking about corn cakes. Corn cakes are far more substantial than pancakes and often include substantive ingredients like corn kernels, or cheese, or jalapenos, and may

not include corn meal at all. What I am writing about are pancakes made with cornmeal and white flour. My experience with cornmeal pancakes begins not with my Southern kin, but at a small Mexican restaurant, where they served absolutely incredible mouth-watering cornmeal pancakes with blueberries that, well, if they were still serving them today, I'd be thinking about travel arrangements.

Properly prepared cornmeal pancakes are not leaden, or heavy; nor are they much like Italian polenta, which is lovely on its own merits, but is not a breakfast dish likely to lure the kids from bed on a Sunday morning, or fix the remnants of a hang over. Properly made cornmeal pancakes will do both, though preferably not at once for the same people. They should be crisp and hot on the outside, and warm and creamy, even fluffy, on the inside. The secret is really in three things:

  • A recipe that is only partly corn meal.
  • A recipe that uses baking powder and/or baking soda, but that MUST use buttermilk (or regular milk soured with a teaspoon or so of vinegar)
  • Cakes that are cooked on a greased/oil very hot skillet. A skillet that isn't hot enough makes a leaden lump.

Here's a basic recipe that makes enough for 8 (cook 'em and freeze 'em!). It calls for real butter; it will work with margarine or canola but real butter really makes a difference in the batter. You can use canola or margarine or Pam to grease the cooking pan:

  • 6 large eggs
  • 2 1/2 cups buttermilk
  • 2 1/4 cups yellow cornmeal
  • 1 cup all purpose flour
  • 1/3 cup sugar
  • 1 tablespoon baking powder
  • 1 teaspoon baking soda
  • 3/4 teaspoon salt
  • 6 tablespoons (about) butter, melted
  • Butter, canola, or margarine to grease the pan
  • Cookie sheet
  • Pure maple syrup
  1. Preheat oven to 250°F. (To keep cooked pancakes warm)
  2. Beat the eggs in a large bowl.
  3. Add the buttermilk, cornmeal, flour, sugar, baking powder, baking soda and salt, alternating the dry ingredients with the buttermilk.
  4. Beat just until mostly smooth. A few lumps are fine; mostly you want to make sure that all the dry ingredients are wet. Over mixing will create amazing cornmeal-textured leather.
  5. Stir in about 6 tablespoons of melted butter.
  6. Grease the cooking pan, or griddle or skillet.
  7. Set the pan on a burner on medium heat.
  8. Test the heat of the pan by sprinking a few drops of water; the water should skitter and dance on the pan before evaporating.
  9. Cook small batches of cornmeal pancakes, by pouring 1/3 to 1/4 of a cup of batter at a time to make round individual cakes, carefully spaced.
  10. Cook the pancakes until they are golden brown on the bottom and you see bubbles around the edges, about 2 minutes.
  11. Turn the pancakes over, carefully, and cook them until the bottoms are golden brown, about 2 minutes.
  12. Transfer pancakes to a baking sheet; place in oven to keep warm.
  13. Repeat with remaining batter, greasing the pan as necessary.
  14. Serve pancakes with syrup.

I like these plain, with butter and maple syrup, or fruit jam, or fruit syrup. I also like them with applesauce and sour cream/yogurt, or with fresh fruit (blueberries, or bananas) or nuts added and gently folded into the batter just before cooking. I also like them with just a hint of butter, a spoon or so of Greek yogurt, and berries. Go ahead and cook them all; you can freeze them, and then just heat them up to serve in a toaster or a skillet.

Dishwasher Cooking at its Finest

Let’s get one thing straight right from the beginning- I am not a chef. I don’t cook very well and often my husband won’t let me into the kitchen, which he considers his domain. He’s gone today, so I decided to try a little experiment- I am cooking some red potatoes with rosemary and chicken in my dishwasher.


Ingredients

  • One chicken breast- (I had more but didn’t want to waste any on the off chance that the dishwasher failed to cook my food correctly.)
  • Red Potatoes 
  • Italian seasoning
  •  Olive oil
  • Fresh Rosemary


The prep work was simple-

I put some olive oil on the chicken breast, seasoned it with a mysteriously named mixture of Italian spices and sliced and diced a red potato.


I went to the herb “garden” (all potted plants) and carefully selected some Rosemary, which seems to grow like a noxious weed in the Seattle area and sprinkled some on the chicken.


 I packaged the entire meal (with the exception of the spinach salad I will eat with it) all up in sturdy tin-foil, double-wrapped it when I realized that the foil was tearing a bit, and put it in the dishwasher to be washed, steam-dried and hopefully cooked. 

With more than a little trepidation, I turned the dishwasher on and listened to my food clunk around with the dishes.


The dishwasher, in case you are wondering, which I am sure you are, is an earlier model and not the silent kind. In fact, if vintage dishwashers were considered fashionable, this particular dishwasher would be worth thousands because I think it was made in the 1950’s, making it one of the first dishwashers ever made.

In addition to being one of the oldest dishwashers ever made, it is one of the slowest and noisiest dishwashers ever made.

I left the kitchen, tried to ignore the noise and did some hard-core “research” (aka web surfing.)

Finally, after enduring an excruciatingly long wash and dry cycle, I opened up the dishwasher, and took out the foil packet. I could smell the rosemary, so took that as a good sign, but when I opened up the  packet, the chicken still wasn’t cooked, which I blame solely on the dishwasher.


 As I’m not particularly a fan of salmonella, I decided to go for round two with the dishwasher and run it again. I know I could have cooked it for a little bit in the oven and enjoyed a meal a little sooner, but that would have ruined the fun.

Mid-way through, I heard a loud popping noise, which I naturally assumed was the chicken exploding, so I ran to the kitchen and once again, performed the not-so-arduous task of opening the dishwasher and re-checked the chicken. Since the breast was thicker than average, it still wasn’t cooked all the way through, but it did smell delicious.


When I took it out again, I actually cut into the food-the chicken was succulent and pretty good, but the potatoes were more like bricks than anything I would consider edible.


Havana Cuban Restaurant in West Palm Beach

From Cubano sandwich stands to upscale fusion restaurants, Florida has no shortage of Cuban eateries. If you're in the West Palm Beach area, just blocks from Delray and the impressive mansions of Boca Raton, be sure to make time for Havana, one of the most authentic, delicious eating experiences in the country. It's inviting, affordable and has an unparalleled menu of Cuban favorites.

Like so many excellent restaurants, Havana is a family affair. The story of Roberto Reyes and his family is a true American immigration epic. The short version has Reyes leaving his native Cuba just prior to the rise of Fidel Castro and settling in south Florida where he worked his way up in the retail business and eventually decided to give the restaurant game a try. His first location was an eatery in Puerto Rico, followed by a small ice cream parlor in Miami. After Reyes lost his livelihood to Hurricane Andrew, he and his family soldiered on to West Palm Beach where they opened Havana in the classic style of both an all-night food stand and a full service restaurant.

Today Havana has accumulated several much deserved awards for its top-notch cuisine and friendly service. The walk-up window is open 24 hours a day and serves anything off the restaurant's menu, but to get the complete experience you'll have to get a table in Havana's lively interior. With warm colors and an intimate loft design, the restaurant provides a jovial atmosphere that lends itself just as much to family dining as a lighthearted dating.

Though creativity is always welcome in cuisine, the true test of a restaurant is how well it does the standards. Havana's beverage menu hits all the right initial notes for a meal. The in-house sangria is mild and summery and the tropical milkshakes (mango especially) aren't cloying or syrupy. The cafe con leche is particularly good for those who have a sweet tooth.

When it comes to appetizers, Havana does simple rather well. The friend yuca is hearty and surprisingly clean-tasting. None of the fried fare at Havana is especially greasy, so the crispy outside of the yuca provides a nice contrast to the soft filling. The house plantains are also excellent. I prefer the sweet maduro variety, but the marquita chips and the green tostones are just as good. Havana's kitchen does tend to serve its salads a bit too light on the dressing for the average American palate, so those looking for a more flavorful cold plate should be sure to ask for extra dressing on the side.

Of the main dishes, Havana does beef especially well. The ropa vieja has a strong tomato undertone and it's perky without being overly spicey. It pairs well with the yellow rice and a hearty side dish like yuca or frijoles. The real standout on the menu is without a doubt the rabo encendido, a lean oxtail dish cooked in an autumnal red wine sauce. The meat is incredibly tender and very rich without feeling decadent. As with so much ethnic cuisine, the rabo encendido is humble ingredients given loving, gourmet treatment.

For dessert, the Havana kitchen recommends the caramel and coconut flan and I don't disagree with them. Those who prefer something a little heavier to go with their cafe con leche should definitely indulge in a slice of tres leches cake.

Havana Restaurant is an inviting culinary gem on the South Dixie Highway. Whether it's for a late night sandwich run or a multi-course family meal, it's one of the all-around best places to grab a bite in south Florida.

Pages